Vehicles
Adding a vehicle manually
Section titled “Adding a vehicle manually”Every car that goes through recon needs to be in the system. The fastest way is to add it by VIN.
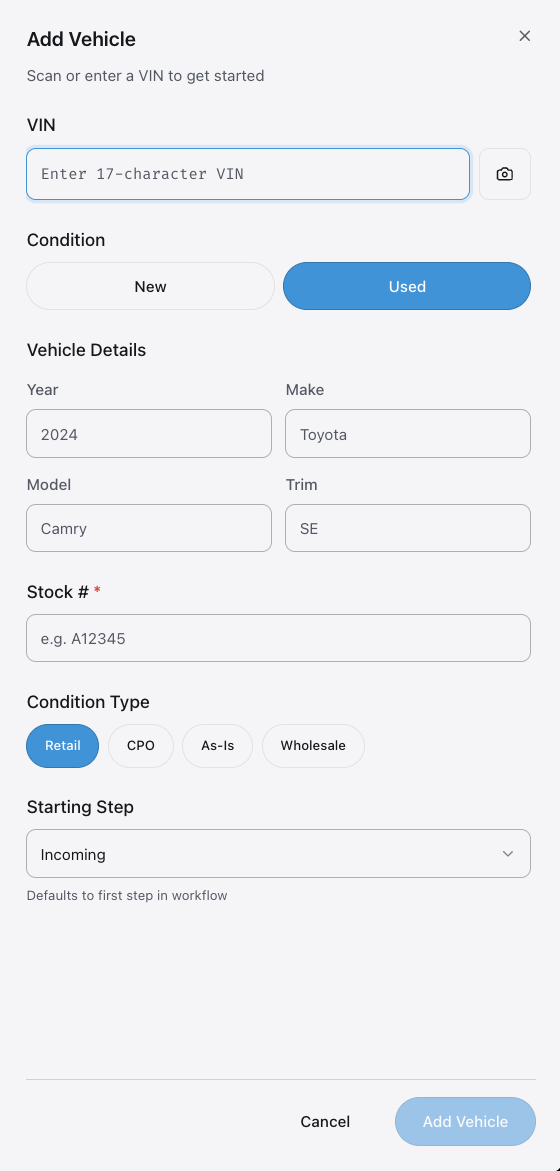
- Tap the + button on the dashboard or the vehicle list.
- Type the VIN into the search field.
- EasyRecon decodes the VIN automatically. Review the year, make, model, and trim.
- Add the stock number, arrival date, and any other details your dealership tracks.
- Tap Save. The car appears on the dashboard in the first step.
The VIN decoder fills in the basics. You still need to confirm the details — wrong year or trim happens. Check it before you save.
Or set up an automated feed — see the next section.
Automated inventory feed
Section titled “Automated inventory feed”Tell us your DMS or inventory provider and we’ll set up an automated feed. Email hello@easyreconauto.com.
Once set up:
- New cars appear on your dashboard automatically.
- If you add a car manually and the feed later sends the same car, EasyRecon merges them — no duplicates.
- If a car drops off the feed (sold, wholesaled), it gets archived automatically. You can still find it by filtering the dashboard.
Moving a car between steps
Section titled “Moving a car between steps”Find the car on your dashboard. Each car has a step button on its card — the colored badge with the current step name on it. Click it, then pick the step you want to send the car to. That’s it.
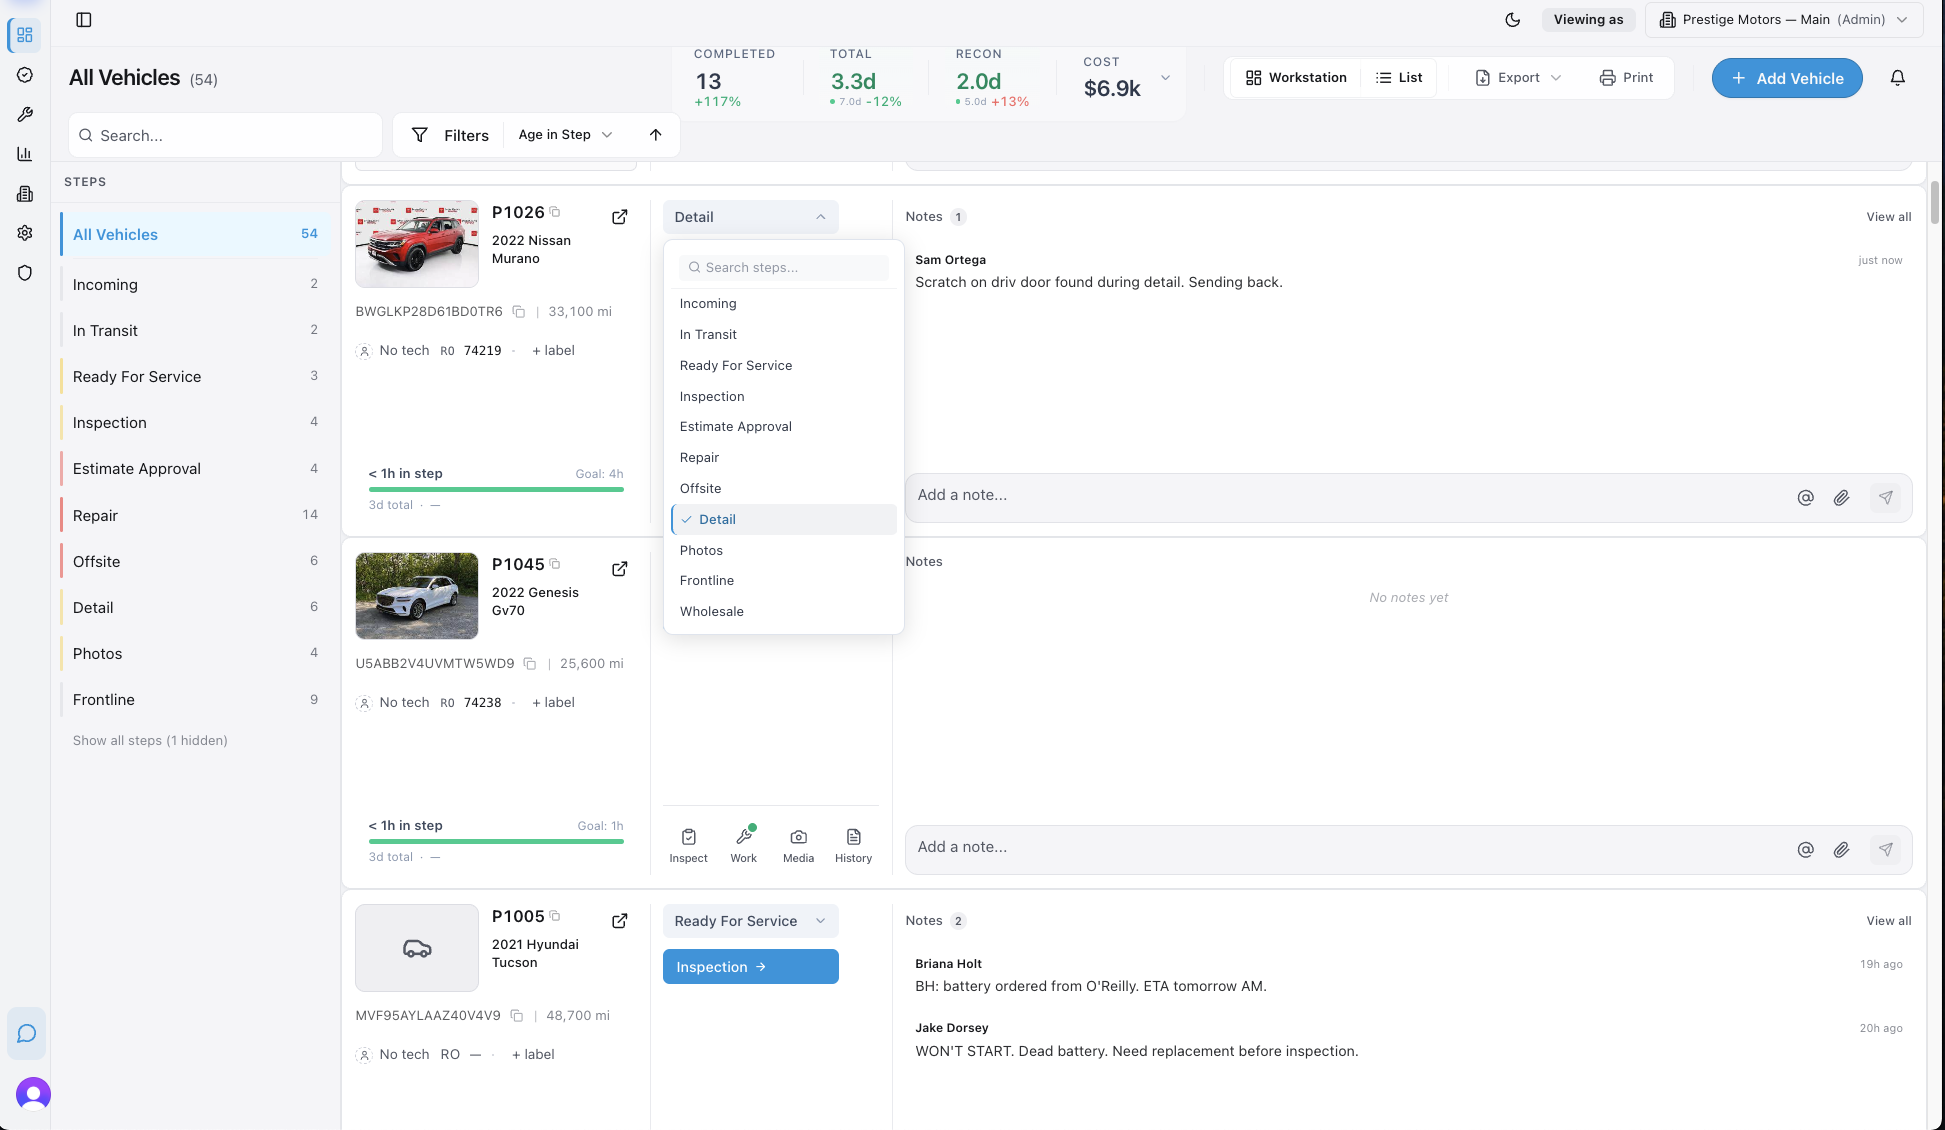
No confirm screen. No “are you sure?” The car moves and the next person in line gets notified.
Picked the wrong step? Click the step on the card again and pick the right one. The car moves again and the new step’s people get notified.
If you don’t see clickable steps on the car, your role doesn’t have permission to move cars. Mention your manager in a note on the car or message them in the group chat — they can move it for you or change your role.
The Overview tab — what you see when you click into a car
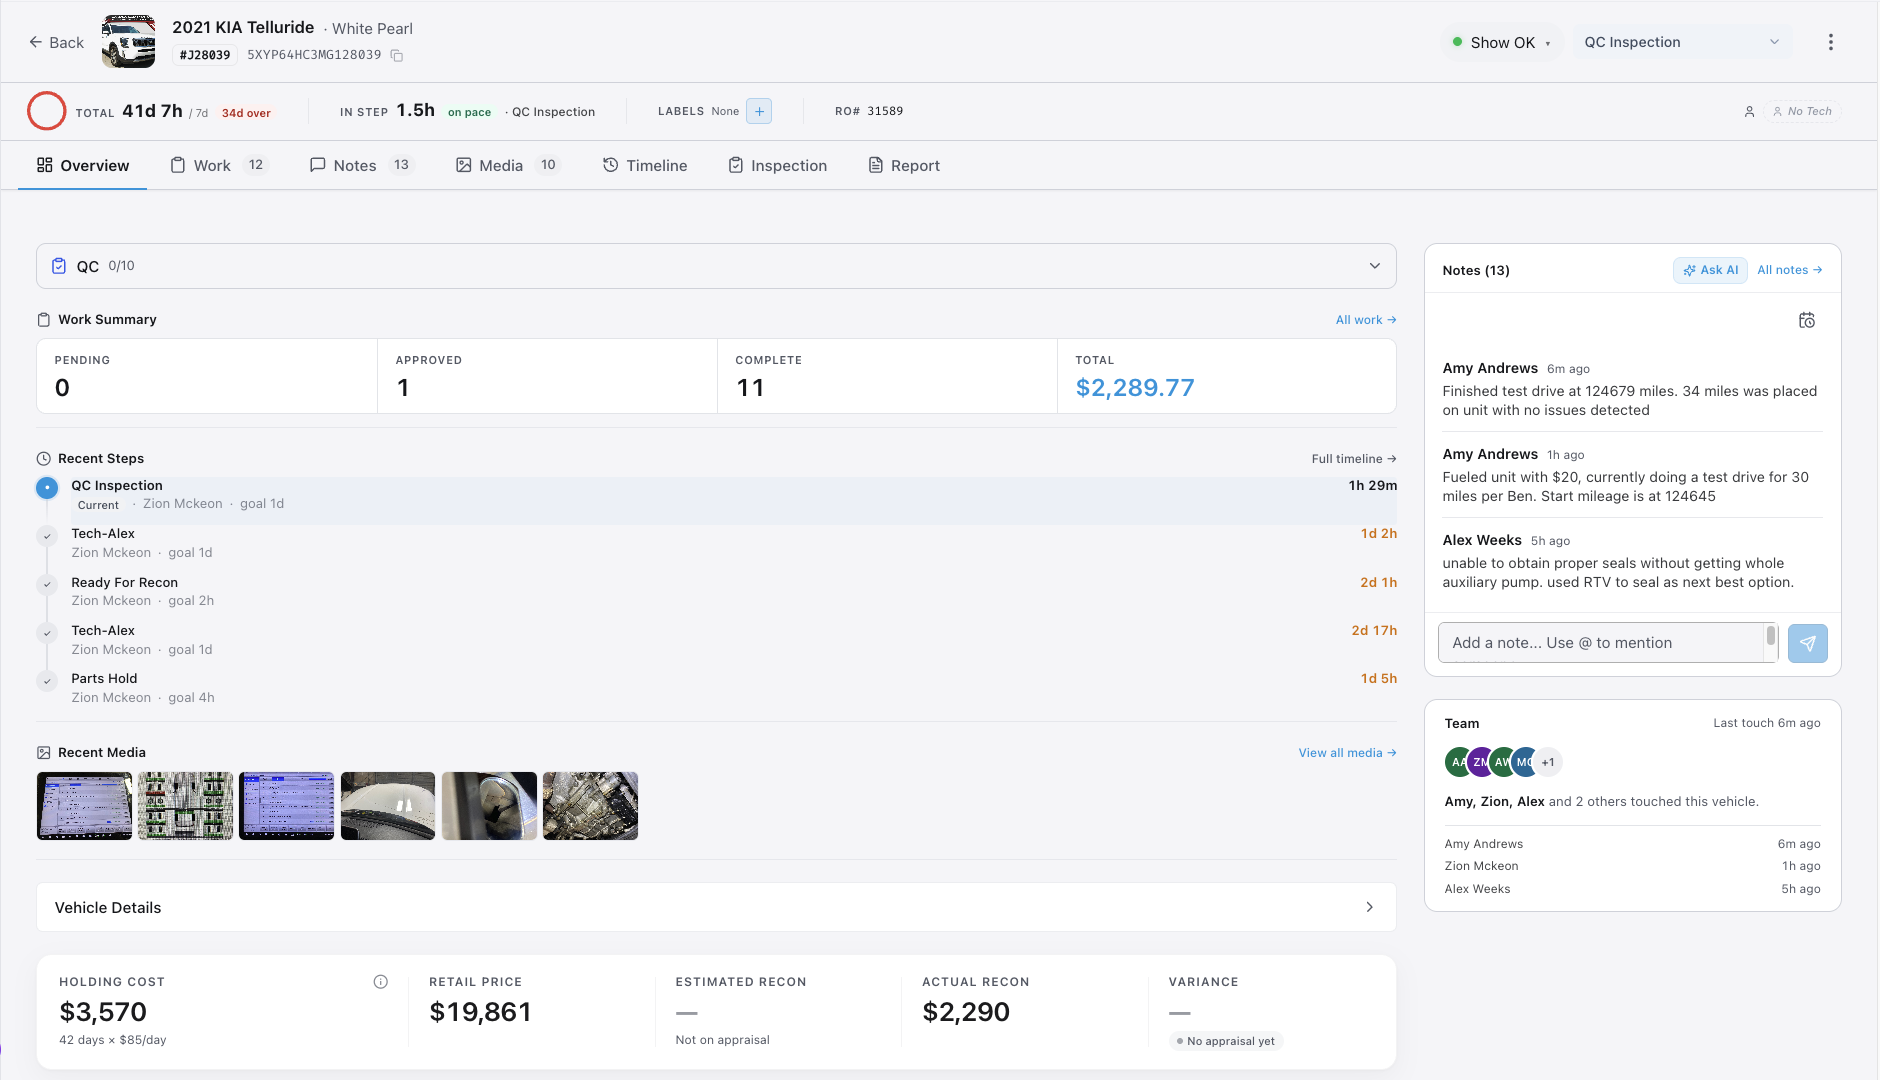
Section titled “The Overview tab — what you see when you click into a car”When you click into a vehicle, the Overview tab is where you land. Five numbers tell the story:
| Field | Where it comes from |
|---|---|
| Retail Price | Your DMS / inventory management solution |
| Estimated Recon | Your DMS — set during appraisal |
| Variance | Estimated Recon minus actual recon spend. Tells you how good your appraisals are. |
| Days in Recon | How long the car has been with you — arrival to current step |
| Holding Cost | Industry-average daily carrying cost — how much you bleed per day the car sits |
Variance
Section titled “Variance”Variance = Estimated Recon − Actual Recon. Quick read:
- Positive variance — came in under estimate. Good for this car. If it’s consistently positive, you may be padding appraisals and passing on cars you could have made money on.
- Negative variance — went over estimate. Bad. If it’s consistently negative, raise your estimates.
A big variance in either direction means your appraisals are off. Use this number to tighten how you appraise.
Holding cost
Section titled “Holding cost”Holding cost shows your real-time bleed. The longer a car sits in recon, the more you owe in daily carrying cost. EasyRecon uses an industry-average rate — this is fixed by EasyRecon, not configurable per dealership.
At the industry average, a car sitting an extra week in recon costs you roughly $350 in carrying cost alone — before any margin you give up by missing the market. The number on the card is what makes that real.
Watch this number — a $50/day holding cost on a 14-day recon is $700 of margin gone.
Shot Clock — deadlines on a car
Section titled “Shot Clock — deadlines on a car”Use Shot Clock for any time-sensitive deadline on a car. Common cases: an arbitration window, parts arriving Tuesday, a customer pickup Friday.
Two ways to set a deadline:
- Type a date in a note — EasyRecon detects it and creates a Shot Clock automatically.
- Click the deadline icon in the top right of the notes composer.
You’ll see active Shot Clocks two places:
- On the car itself (in the notes feed)
- On the Calendar view
This is how you track “parts arriving Tuesday” without writing it on a Post-it.
Readiness Light — sales sees green/yellow/red
Section titled “Readiness Light — sales sees green/yellow/red”A colored dot on each car card tells sales whether to show it. The manager sets it.
| Color | Meaning |
|---|---|
| Green | Ready to show. Clear to sell. |
| Yellow | Showable, but there’s a small issue. Heads up. |
| Red | Don’t show. Something’s actually wrong with the car. |
Archiving a car
Section titled “Archiving a car”If you have an inventory feed set up, you almost never archive manually. The feed handles it when a car is sold or off the lot.
For edge cases (you bought a car that doesn’t belong in recon, you wholesaled it manually), click the archive button on the car.
You can always find an archived car. Filter the dashboard by status → archived, or use search. EasyRecon never deletes vehicles — they just leave the active flow.
The Transparency Report — share with the customer
Section titled “The Transparency Report — share with the customer”Every car in EasyRecon has a public link you can send to the customer. The link shows what was done in recon — work completed, photos, notes marked as customer-visible.
Hit the Share Report button on a car to copy the link, then text it or paste it into a delivery email. The customer opens a clean summary of what your dealership did to get the car ready.
(If you ever need to build the URL manually for a templated email, the pattern is https://app.easyreconauto.com/r/[VIN] — but the button is faster.)
This is useful at delivery. It answers “what did you do to this car?” before the customer asks.
To share the link:
- Open the vehicle.
- Find the Share Report button near the top of the Overview tab.
- Tap it to copy the link.
- Paste it wherever you want to send it.